The latest version of this text can be found at https://info340.github.io/.
Chapter 19 Firebase
This chapter discusses how to integrate and utilize the Firebase web service into a client-side application (using React). Firebase is a web service that provides tools and infrastructure for use in creating web and mobile apps that store data online in the cloud (a “web backend solution”). In effect, Firebase acts as a server that can host information for us, so that you can just build client-side applications without needing to program a web server.
- Firebase is owned and maintained by Google, but will still work perfectly fine with Facebook’s React framework.
In particular, this chapter will discuss two features of Firebase:
The Firebase service offers a client-side based system for performing user authentication, or allowing users to “sign in” to your application and have particular information associated with them. It’s possible to have users sign up with an email and password, or even using an external service (e.g., “sign up with Facebook”). Firebase also provides a way to manage all those extra interactions associated with accounts, like being able to reset passwords or confirm email addresses. And this is all performed securely from the client-side, without the need to set up an additional server to perform OAuth work.
The Firebase service also provide a realtime database, which provide a cloud-hosted database for persisting data between page visits. Firebase’s database is a NoSql-style database: you can think of it as a single giant JSON object in the Cloud. Firebase provides methods that can be used to refer to this object and its properties, make changes to the object, and even “listen” for changes made by others so that the page can automatically update based on actions taken by other users. In effect you can create a data binding between clients and the server, so that if you update data on one machine, that change automatically appears on another.
These features mean that Firebase can be a go-to back-end for producing a client-side app that involves persisted data (like user accounts). And its free service tier is perfectly suited for any development app.
Important note: Firebase updated to version 3.0 in May 2016. This was a massive revision to the API and how you should interact with the service. Watch out for out-dated “legacy” examples. when looking for help.
19.1 Setting up Firebase
Because Firebase is a cloud service, you will need to set it up externally in order to use it in your web application. Firebase setup and configuration is handled on Firebase’s website at https://firebase.google.com/, and in particular in the Firebase Web Console where you can manage individual projects.
When developing a Firebase app, you will want to keep the Web Console open so you can check on the user list and database.
Creating a Project
In order to use Firebase in your web app, you will need to sign up for the service. Visit https://firebase.google.com/ and click the “Get Started” button to do so. You will need to sign in with a Google account (e.g., a UW account if you’ve set up Google integration). Signing up will direct to the Firebase Web Console.
In the Web Console, you can manage all of your “projects”—one per application you’ve created. Each project will track its own set of users and have its own database of information.
You can create a project by clicking the “Add Project” button. In the pop-up window that appears, you’ll need to give the app a unique name. Naming the project after your app is a good idea. This name is used internally by the Firebase system (it won’t necessarily be visible to your users).
Once you’ve created the project, you will be taken to the Web Console for that project. This is a web page where you will be able to manage the configuration of the project, the users who have signed up, and any data in the database. In particular, note the navigation menu on the left-hand side: you will use this to access different parts of your project (Authentication to manage users, and Database to manage the database).
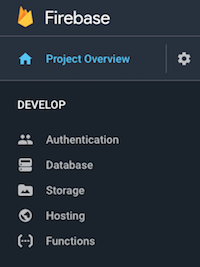
Firebase navigation menu.
Including Firebase in React
In order to use Firebase in a web app (including a React app), you will need to add the Firebase library to your web page, as well as some specify some configuration data to connect to the correct Firebase project.
From the project’s Web Console page, click the “Add Firebase to your web app” button. This will produce a popup with some HTML code for loading the Firebase library, as well as an inline <script> that configures your app to use Firebase.
However, in a React app you should integrate Firebase directly into your source code instead of modifying the HTML. You can do this by modifying the index.js file:
First, install and Firebase library using
npm:# in your app repo npm install --save firebaseimportthe Firebase library into yourindex.jsfile. To only load the core firebase functionality, you can just import the'firebase/app'module.import firebase from 'firebase/app';You can also
importmodules with the specific pieces of functionality you need, such as user authentication and the real-time database.import 'firebase/auth'; import 'firebase/database';(These modules don’t export any need functions beyond modifications to the core Firebase app, so you don’t need to assign a variable name to the resulting value).
To configure your web app, copy and paste the contents of the
<script>file shown on the Firebase Web Console (The// Initialize Firebase ...part). Do this before theReactDOM.render()call.This will specify which Firebase project your web app should connect to.
19.2 User Authentication
Firebase provides the ability to authenticate users: to let people sign up for you application and then to check that they are who they say (e.g., have provided the right password). Firebase supports multiple different forms of authentication: users can sign up with an email and password, log in with a social media service such as Google or Facebook, or even authenticate “anonymous” (so you can at least keep track of different people even if you don’t know who they are).
In order to support user authentication, you will need to enable this feature in the Firebase Web Console. Click on the “Authentication” link in the side navigation menu to go to the authentication management page. Under the “Sign-In Method” tab, you can choose what forms of authentication you wish to enable.
- For example, click on the “Email/Password” option, and then flip the switch to “Enable” that method. Be sure and Save your changes!
Note that you will be able to use this page to see and manage users who have signed up with your Firebase project. This is where you can see if uses have successfully been created, look up their User UID for debugging, or delete users from the project:
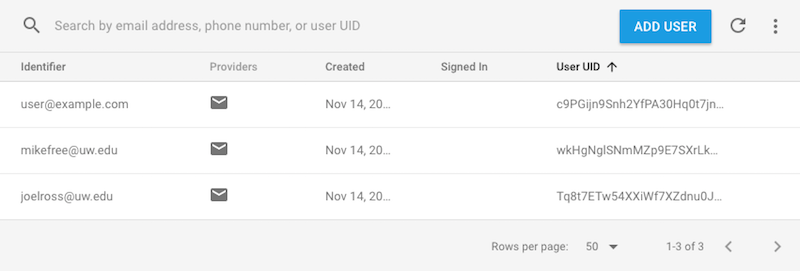
Firebase users.
Creating Users
In order to create a user programmatically (e.g., from JavaScript when the user submits a sign-up form), you can use a function provided by the firebase module. Specifically, you’ll call the wordily-named function firebase.auth().createUserWithEmailAndPassword passing it the email and password the user is signing up with. This will create a new user account in Firebase (you can view it in the Firebase Web Console), as well as log in the user.
firebase.auth().createUserWithEmailAndPassword(email, password)
    .then((firebaseUser) => {
        console.log('User created: '+firebaseUser.uid);
        //...
    })
    .catch((error) => { //report any errors
        console.log(error.message);
    });
Remember to
import firebase from 'firebase/app'in any module that you need to access thefirebaseglobal variable!The
createUser...method is called onfirebase.auth(). Theauth()function returns an “authenticator” object that can manage user login which gets an “authenticator” object that is connected to the web service and can manage user login information.The
createUser...method returns a Promise, so you can use the.then()method to do further work after the user is created (e.g., logging out that they have been created). The Promise callback is passed a “Firebase User” object, which contains data about the user who has just been created and signed in. For example, this object contains auidproperty, which is the unique id of that user generated by Firebase. This is like the “internal codename” for users that you can use to identify them.
**Pro-tip:** You don’t need to come up with real email addresses for testing. Try using a@a.com, b@a.com, c@a.com, etc. Similarly, password works fine for testing passwords (though you should never do that in real life!)
User Profiles
It is also possible to store some additional information for each user in what is called the user’s profile. Specifically, each user can assigned a displayName (a username separate from an email address) and a photoURL (a link to a profile picture for that user).
let name = firebaseUser.displayName; //the user's name
let pic = firebaseUser.photoURL; //the user's picture
You can specify these profile properties of a Firebase User by by calling its updateProfile() method, passing it an object with the new values to assign to those properties:
firebaseUser.updateProfie({
    displayName: "Ada",
    photoURL: "http://domain.com/picture.png"
})- This method also returns a Promise, so you can use
.then()to do something after the profile is updated, or.catch()to handle any errors. Note that a good practice is to call this method from inside thecreateUserWithEmailAndPassword()callback (on the passed in Firebase User), and then return the resulting promise for handling, thereby “chaining” the user creation and profile specification.
You cannot assign values directly to any Firebase variables (including Firebase Users), since that data needs to be uploaded to the web (via an AJAX request). Instead, you will need to call a method to update these objects.
Authentication Events
The firebase.auth() variable will keep track of which Firebase User is currently logged in—and this information persists even after the browser is closed. This means that every time you reload the page, the firebase.auth() function will perform the authentication and “re-login” the user.
The recommended way to determine who is currently logged in is to register an event listener for to listen for events that occur with the “state” of the authentication changes (e.g., a user logs in or logs out). This event will occur when the page first loads and Firebase determines that a user has previously signed up (the “initial state” is set), or when a user logs out. You can register this listener by using the onAuthStateChanged method:
let authUnregFunc = firebase.auth().onAuthStateChanged((firebaseUser) => {
    if(firebaseUser){ //firebaseUser defined: is logged in
        console.log('logged in');
        //do something with firebaseUser (e.g. assign with this.setState())
    }
    else { //firebaseUser undefined: is not logged in
        console.log('logged out');
    }
});
Because this authentication involves connecting to the Firebase app, it my perform network access. Thus in a React application, this listener should be registered in the
componentDidMount()lifecycle callback.The
onAuthStateChanged()method takes a callback as a parameter, which will be handed a value representing the current Firebase User (or undefined if no one is logged in).The most common practice is to then take this passed in object and assign it to a more global variable, such as a
statevariable in a React function (e.g.,this.setState({currentUser: firebaseUser})).The
onAuthStateChanged()method returns a new function that can be used to “unregister” the listener when you want to stop responding to authentication changes. You can save this variable for later (e.g., as an instance variable).In React applications, you will want to unregister the listener when the component is removed, in the
componentWillUnmountlifecycle callback.
Signing In and Out
You can sign a user in or out by using addition methods called on firebase.auth(), which do exactly what they suggest:
//sign in a user
firebase.auth().signInWithEmailAndPassword(email, password)
   .catch(err => console.log(err)); //log any errors for debugging

//sign out a user
firebase.auth().signOut()
.catch(err => console.log(err)); //log any errors for debugging- Both of these methods return Promises, so you can
.catch()and display any errors.
19.3 Realtime Database
One of the main features provided by the Firebase web service is a realtime database for storing and accessing data in the cloud. You can think of this database as being a single giant JSON object in the Cloud that can be simultaneously accessed and modified by multiple clients—and since each client reads the same database, changes made by one user will be seen by others as real-time updates.
For example, you might have a database that is structured like:
{
  "people" : {
    "amit" : {
      "age" : 35,
      "petName" : "Spot"
    },
    "sarah" : {
      "age" : 42,
      "petName" : "Rover"
    },
    "zhang" : {
      "age" : 13,
      "petName" : "Fluffy"
    }
  }
}
This database object has a people key that refers to an object, which itself contains keys that refer to individual “person” objects (each of which has an age and petName property).
In the Firebase Web Console (under the “Database” tab in the navigation menu), this data structure would be presented as:
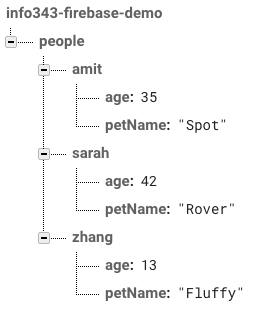
A Firebase database.
- Note that in the Firebase Web Console you can edit this database directly: viewing, adding, editing, and deleting elements in the JSON. This is useful for debugging—both to check that your code is editing the database accurately, and to clean up any mistakes.
Although the JSON database can have many levels of nested objects, best practice is to try and keep the structure as “flat” as possible. This avoids you needing to download the nested “details” for a value if you only need to know e.g., the key names. See Structure Your Data for more details and examples.
Security Rules
Because the Firebase database is just a giant JSON object in the cloud and is usable from a client-side system, technically anyone can access it. Each element of the JSON object is accessible via AJAX requests (which are sent via firebase functions).
In order to restrict what clients and access this information (read or write to values in the JSON), Firebase lets you define security rules that specify what users can access which elements. For example, you can make it so that only authenticated users can add new entries the database, or that only specific users can update specific entries (e.g., the comments they wrote on a blog).
- By default, the database can only be accessed and modified by authenticated users. Thus you almost always need to modify the rules to allow people to utilize your website without being logged in.
In order to set up the security rules, you need to click on the “Database” link in the side navigation of the Firebase Web Console. Under the “Rules” tab, you can see the default defined rules defined for the database. Firebase Security Rules are defined in JSON using a very particular and difficult to understand schema (particularly if you want to customize the access to particular values in the database)
- Basically, inside the “rules” object you specify a JSON tree that mirrors the structure of your database. But instead of having a value for the keys in your database, you specify an object with
".read"and".write"properties. The values of these properties are boolean expressions that state whether or not the current user is able to read (access) or write (modify) that value.
Luckily, Firebase provides a handy set of sample rules that cover the most common situations. For example:
{
  "rules": {
    ".read": true,
    ".write": true
  }
}
This specifies that everyone can both read and write the entire database. This is a good rule to begin with for testing. For more details on how to write specific security rules, see Secure Your Data
- Be sure and hit “Publish” to save your changes!
Reading and Writing Data
Once you’ve set up access rules for your database, you can begin reading and writing data to it programmatically from your JavaScript. To do this, you will need to first get a reference to the database. This is done using the firebase.database().ref() method. This method takes as a parameter the key-path of the element in the JSON you wish to access:
//get reference to the "root" of the database: the containing JSON
let rootRef = firebase.database().ref();

//refers to the 'people' value in the database
let peopleRef = firebase.database().ref('people');

//refers to the "sarah" value inside the "people" value in the database
//similar to `database.people.sarah` using dot notation
let sarahRef = firebase.database().ref('people/sarah');
Indeed, every single value in the Firebase database can be accessed using a URI-style “path notation”, where each nested key is indicated by a slash / (rather than the . in dot notation). Since this parameter is just a string, you can use string concatenation to construct the path to a particular value you wish to reference (e.g., if you only want to b working with the value for a particular person).
- In fact, this “path” can be used to reference that database value as a specific resource (in the RESTFul sense). Each database entry can be accessed at
https://my-project-name.firebaseio.com/path/to/value. This is how you can modify Firebase by using pure AJAX requests (instead of thefirebaselibrary).
Alternatively, you can use the .child() method to get a reference to a specific “child” element in the database:
//this is equivalent to the above
let sarahRef = firebase.database().ref('people').child('sarah');
Once you have a reference to a particular entry in the database, you can modify the value at that entry using the .set() method. This method takes as an argument an object containing the keys and values you wish to assign to the that particular reference:
let sarahRef = firebase.database().ref('people').child('sarah');

//change Sarah's age to 43 (happy birthday!)
sarahRef.set( {age: 43} )
    .catch(err => console.log(err)); //log any errors for debugging
Similar to React’s
setState()method, the Firebase’sset()method will overwrite the values for any keys specified in its parameter, but leave other values unchanged. Any keys that did not previous exist will be added:sarahRef.set( {favFood: "pizza"} ); //add a new key firebase.database().ref('people').set({ //add a new entry to `people` ada: {age:27, petName:"Charles"} //27-year-old Ada has pet named "Charles" });
Listening for Data Changes
Because Firebase is structured as realtime database (that may change over time), you read data from it by registering an event listener to listen for changes to that database. Firebase provides a method .on() for registering such listeners. Similar to the DOM’s addEventListener() function, Firebase’s on() method takes two parameters: an event name (as a string) and a callback function that should be executed when the event occurs:
let amitRef = firebase.database().ref('people/amit');
amitRef.on('value', (snapshot) => {
    let amitValue = snapshot.val();
    console.log(amitValue); //=> { age: 35, petName: "Spot" }
    //can do something else with amitValue (e.g., assign with this.setState())
});
While Firebase supports a number of different “database change events”, the most common to listen for is the
'value'event, which occurs when the data entry is first created or whenever it changes. Other events includechild_added,child_removed, andchild_changed, which can be useful if you want to know how the database changed (not just that it did change)!The callback function will be passed a data snapshot as a parameter. This is a wrapper around the database JSON tree (allowing you to navigate it e.g., with
.child()). More commonly, you will want to convert it into an actual JavaScript object by calling the.val()method on it.Because this listener involves network access, in a React App you would want to register this listener in the
componentDidMount()callback. You’ll also need to “clean up” and remove the listener if the component gets removed (in thecomponentWillUnmount()callback) to avoid errors. You can remove a listener from a database reference by using the.off()method (to cancel the.on()):amitRef.off();
Note that you can also read a single value once (without needing to register and unregister a listener) by using the .once() method, which will return a promise that will contain the read data (once it is downloaded).
Firebase Arrays
When working with and storing data in the cloud, we often want to organize that data into lists using arrays. However, Firebase does not directly support support arrays: the JSON object in the sky only contains objects, not arrays! This is because Firebase needs to support concurrent access: multiple people need to be able to access the data at the same time. But since arrays are accessed by index, this can cause problems if two people try to modify the array at the same time.
The problem is that with an array, an index number doesn’t always refer to the same element! For example, if you have an array ['a', 'b' 'c'], then index 1 may initially refer to the 'b'. However, if you add an element onto the beginning of the array, then suddenly that 1 index refers to the 'a', and so if a user was trying to modify the 'b' before their machine was aware of the change, they may end up editing the wrong value! This bug is an example of a race condition, which can occur when two processes are modifying data concurrently (at the same time).
To avoid this problem, Firebase treats all data structures as Objects, so that each value in the JSON tree has a unique key. That way each client will always be modifying the value they expect. However, Firebase does offer a way that you can treat Objects as arrays: databases references support a push() method that will automatically add a value to an object with an auto-generated key.
let tasksRef = firebase.database().ref('tasks'); //an object of tasks
tasksRef.push({description:'First things first'}) //add one task
tasksRef.push({description:'Next things next'}) //add another task
This will produce a database with a structure:
{
  "tasks" : {
    "-KyxgJhKOVeAj2ibPxrO" : {
      "description" : "First things first"
    },
    "-KyxgMDJueu17348NxDF" : {
      "description" : "Next things next"
    }
  }
}- Notice how the
tasksis an Object (even though we “pushed” elements into it), and each “task” is assigned an auto-generated key. You would thus still be able to interact withtasksas if it were an array, but instead of using a value from0tolengthas the index, you’ll use a generated “key” as the index.
Firebase snapshots do support a forEach() function that you can use to iterate through their elements, allowing you to loop through the elements in an array. However, if you want to do something more complex (like map(), filter(), or reduce()), you need an actual array. The best way to get this is use call Objects.keys() on the snapshot.val() in order to get an array of the keys, and then you can iterate/map that (accessing each element in the “array” using bracket notation).
Note that when looping through an “array”, each element is treated handled separately from its key (the same way that a forEach() loop lets you work with array elements separately from their index). But since you need that key as an identifier in order to ref() and modify the JSON element later, you will need to make sure that you “save” the key in the object as you processing it:
//assume `tasksSapshot` is a snapshot of the `tasks` "array"
let tasksObject = tasksSnapshot.val(); //convert snapshot to value
let taskKeys = Object.keys(tasksObject);
let taskArray = taskKeys.map((key) => { //map array of keys into array of tasks
    let task = tasksObject[key]; //access element at that key
    task.key = key; //save the key for later referencing!
    return task; //the transformed object to store in the array
});
Don’t lose your key!
This is a quick overview of some major functions provided by Firebase. The service also offers additional options, including cloud storage for larger media such as images or video. For details and additional function, see the official documentation.