The latest version of this text can be found at https://info340.github.io/.
Chapter 4 Standards and Accessibility
This chapter details considerations and techniques to ensure that your web pages and applications can be used by everyone, regardless of their choice of web browser or their own physical abilities. It will provide detailed information on the following strategies for building accessible pages:
- Using semantically meaningful HTML tags
- Providing alternate text for visual features (i.e., images)
- Describing the role of elements on your page (if it isn’t clear based on the element type)
- Hiding unnecessary content (i.e., visual flare) from screen readers
4.1 Web Standards
As discussed in Chapter 2, the HTML and CSS files you author are delivered to clients upon request. The code within these files is interpreted by the web browser in order to create the visual presentation that the user can see and interact with.
A web browser is thus any piece of software capable of rendering these .html and .css files (and sending HTTP requests to fetch them in the first place). And there are many different web browsers in the world:
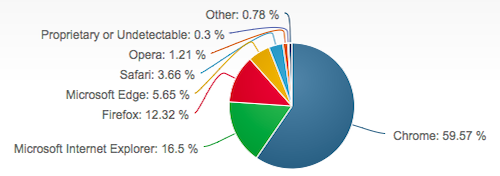
Desktop browser market share July 2017, from netmarketshare.com. See also caniuse.com’s usage table for information on mobile and older browsers.
- Note that while there may be some clear “winners” in terms of browser popularity, do not dismiss less popular browsers. For example, if 0.34% of users use Internet Explorer 8 (July 2017), that’s roughly 1,300,000 people worldwide.
These web browsers are all created by different developers, working for different (often rival!) organizations. How is it that they are all able to read and interpret the same code, and produce the same rendered output? Standards.
Web Standards are agreed-upon specifications for how web page source code should be rendered by the browser. Web standards detail both the language syntax (e.g., how to write HTML tags) and the language semantics (e.g., which HTML tags to use), so that it can be understood by any browser that follows (agrees to) that standard. And since as a developer you want your pages to render the same across all browsers, web standards give the requirements for how you should write your code so that your pages render correctly.
Modern web standards are created and maintained by a huge group of stakeholders known as the World Wide Web Consortium (W3C), which includes major browser developers such as Google and Mozilla. However, this group has no enforcement powers: and so browsers often deviate from the published standards! A browser may ignore a standard to “help out” developers (e.g., making a “best guess” to render malformed HTML content), or to introduce new features (e.g., a new CSS property that produces some special effect). Some browsers are better at conforming to the accepted standards than others. Internet Explorer—IE 6 in particular—is notorious for not meeting standards and requiring extra effort from developers to make pages work. This is part of what IE has such a bad reputation and gets so much scorn from developers (though Microsoft Edge, the browser in Windows 10, is awesome about being standards compliant).
Getting so many people to agree on a standard of communication takes time; thus web standards change relatively slowly: the HTML 4 standard was adopted in 1997, but the HTML 5 standard (that this course teaches) wasn’t finalized until 2014. The CSS 3 standard is broken up into more than 50 different modules that are developed and introduced independently, and so is continuously being adopted piece-wise.
When introducing new or experimental CSS properties, browsers historically utilized vendor prefixes in naming the properties. As standards are being decided upon, each browser may treat that property in a slightly different way, thus forcing developers who want to use the “latest and greatest” to provide a different definition or value for each vendor. Prefixes are a naming convention that will cause the property to only be understood and applied by a particular browser; e.g., -webkit-hyphens would use the Webkit version of the hyphens property (for controlling word breaks), while -ms-hyphens would use the IE version. This practice is currently discouraged and being phased out, though prefixes may be required when supporting older browsers. Tools such as Autoprefixer can help automatically manage prefixes.
In general, as long as you program webpages that conform to web standards, they will work on all “modern browsers”—though there may still be a few cross-browser compatibility concerns to notice. You should thus test and validate your code against the standards (and so don’t ned to test it on every possible browser!). Luckily, the W3C provides online tools that can help validate code:
- W3C HTML Validation Service
- W3C CSS Validation Service
- W3C Developer Tools for a complete list of validators
To use these services, simply enter your web page’s URL (or copy and paste the contents of your .html or .css files), and then run the validation. You will definitely want to fix any errors you get. Warnings should be considered; however, it is possible to get false positives. Be sure and read the warning carefully and consider whether or not it is actually a “bug” in your code!
Supporting really old browsers that are not standards compliant is left as an exercise to the reader.
Develop for other people’s browsers, not your own! Just because it “works” for you, doesn’t mean it works for anyone else. Test your code against standards and automated systems; don’t just look at the rendered result in a single browser!
4.2 Why Accessibility
Consider the following hypothetical webpage user:
Tracy is a 19-year-old college student and was born blind. Through high school she did well as she could relying on audio tapes and books and the support of tutors, so she never bothered to really learn Braille. She is interested in English literature and is very fond of short stories; her dream is to become an audiobook author. Tracy uses the Internet to share her writing and to connect with other writers through social networks. She owns a laptops and uses a screen reader called JAWS: a computer program which reads her screen out loud to her in an artificial voice. (Adapted from here)
One of the most commonly overlooked limitations on a website’s usability is whether or not it can be used by people with some form of disability. There are many different forms of disabilities or impairments that may affect whether or not a person can access a web page, including:
- Vision Impairments: About 2% of the population is blind, so use alternate mediums for reading web pages. Farsightedness and other vision problems are also very common (particularly among older adults), requiring larger and clearer text. Additionally, about 4.5% the population is color-blind.
- Motor Impairments: Arthritis occurs in about 1% of the population, and can restrict people’s ease at using a mouse, keyboard or touch screen. Other impairments such as tremors, motor-neuron conditions, and paralysis may further impact people’s access.
- Cognitive Impairments: Autism, dyslexia, and language barriers may cause people to be excluded from utilizing your website.
If you fail to make your website accessible, you are locking out 2% or more of users, reducing the availability and use of your site. Indeed, even web companies with their capitalist world-view are finally seeing this population as an important but excluded market; for example, Facebook has an entire team devoted to accessibility and supporting users with disabilities. “Accessibility Engineers” have good job prospects.
Supporting users with disabilities is not just the morally correct thing to do, it’s also the law. US Courts have ruled that public websites are subject to Title III of the Americans with Disabilities Act (ADA), meaning that is a possible and not uncommon occurrence for large organizations to be sued for discrimination if their websites are not accessible. So far, “accessibility” has legally meant complying with the W3C’s Web Content Accessibility Guidelines (WCAG) (see below), a standard that is not overly arduous to follow if you consider accessibility from the get-go.
Finally, designing your website (or any system) with accessibility in mind will not just make it more usable for those with disabilities—it will make it more usable for everyone. This is the principle design Universal Design (a.k.a. universal usability): designing for accessibility—being usable by all people no matter their ability (physical or otherwise)—benefits not just those with some form of limitation or disability, but everyone. The classic real-world example of universal design are curb cuts: the “slopes” built into curbs to accommodate those in wheelchairs. However, these cuts end up making life better for everyone: people with rollerbags, strollers, temporary injuries, small children learning to ride a bicycle, etc.
Universal design applies to websites as well:
- If you support people who can’t see, then you may also support people who can’t see right now (e.g., because of a bad glare on their screen).
- If you support people with motor impairments, then you may also support people trying to use your website without a mouse (e.g., from a laptop while on a bumpy bus).
- If you support people with cognitive impairments, then you may also support people who are temporarily impaired (e.g., inebriated or lacking sleep).
If you make sure that your web page is well-structured and navigable by those with screen readers, it will ensure that it is navigable by other machines, such as search engine indexers. Or for unusual or future browsers (a virtual reality browser perhaps).
Thus supporting accessibility in client-side web development is important both for helping a population that is often overlooked (a form of social justice), as well as for supporting new technologies and systems. This fact is increasingly being acknowledged by companies as key to usability, and thus it is important that you apply it to your own design work.
In addition to individual capabilities, people are also reliant on a large amount of existing infrastructure to ensure that they have an internet connection and their requests can reach your web server. The lack of such access is often tied to economic or social inequalities, forming what is called the digital divide. Considering the availability of network access and other infrastructural needs is vitally important when developing information technologies, but is difficult to manage through client-side development (though see Responsive Design for some things you can do).
4.3 Supporting Accessibility
In this course, we will primarily aim to support accessibility for users with visual impairments such as those using screen readers. A screen reader is a piece of software that is able to synthesize and “read” content on a computer’s screen out loud through the speakers, so that users are able to navigate and control the computer without needing to see the screen. Screen readers are often combined with keyboard controls, so that users use just the keyboard to control the computer and not the mouse (almost like a command line interface!).
There are a number of different screen reader software packages available:
- Macs have had VoiceOver built into the operating system since 2005, though it has been refined with each new OS version.
- On Windows, the most popular screen readers are JAWS and NDVA. Windows also has a built-in screen reader called Microsoft Narrator, which with Windows 10 is beginning to reach parity with the 3rd-party offerings.
You should try out this software! Follow the above links to learn how to turn on the screen reader for your computer, and then try using it to browse the internet without looking at the screen. This will give you a feel for what it is like using a computer while blind.
Screen readers are just software that interpret the HTML of a website in order to allow the user to hear and navigate the content—they are basically non-visual web browsers. As such, supporting screen readers just means implementing your web site so it works with this browser. In particular, this means making sure your page conforms to the Web Accessibility Content Guidelines (WCAG). This is a list of principles and techniques that you should utilize when authoring HTML documents in order to make sure that they are accessible. The guidelines are driven by 4 main principles:
- Perceivable: Information and user interface components must be presentable to users in ways they can perceive.
- Operable: User interface components and navigation must be operable.
- Understandable: Information and the operation of user interfaces must be understandable.
- Robust: Content must be robust enough that it can be interpreted reliably by a wide variety of user agents, including assistive technologies.
More concretely, accessible web pages are those that can be navigated by screen readers (so people can easily get to the information they care about), and have content that can be perceived by screen readers (so is not just presented visually).
Don’t worry: there are simple, specific implementation steps you can use to follow these principles, the most common of which are described below.
Semantic HTML
A major step in making sure your web pages are accessible is to make sure that your use of HTML elements is semantic. HTML elements should be used to describe the meaning or form of their content, not to give that content a visual appearance!
For example, an <h1> element is used to indicate a top-level heading, such as the title of the page. But by default, browsers will give <h1> elements a different visual appearance than unmarked content (usually by making it larger and bold). It is possible to achieve a similar visual effect just using CSS:
<!-- html -->
<h1>This is a real heading!</h1>
<div class="fake-header">
    This just LOOKS like a heading.
</div>
/* css */
.fake-header {
font-size: 2em;
font-weight: bold;
}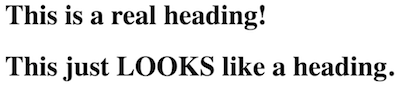
A real heading and a fake heading
Your HTML should always be semantic! A screen reader will (mostly) ignore the CSS, so if something is supposed to be a top-level heading, you need to tag it as such for the screen reader to understand that. Similarly, you should only use elements when they are semantically appropriate—don’t use an <h3> element just because you want text to look bigger if it isn’t actually a third-level heading (use CSS to do the styling instead).
HTML is just for semantics. CSS is for appearance.
This is the same reason that you should never use the <i> tag to make elements italic. The <i> tag has no valuable semantic meaning (it just means “italic”, or “different”); instead you want to use a more meaningful semantic tag. Usually this means <em>, since italic text is usually being emphasized.
In fact, HTML 5 includes a large number of semantic elements that can be used to indicate “formatted” text that has a particular meaning, including ones such as: <abbr>, <address>, <cite>, <del>, <dfn>, <mark>, and <time>. Be sure and check the documentation for each of these elements to determine when they are supposed to be used (as well as what additional attributes they may support).
Never use the <table> tag to structure documents and position content. The <table> tag should only be used for content that is semantically a table (e.g., a data table). If you want to lay out content in a grid, use a CSS system such as Flexbox (see Chapter 7).
ARIA
The WCAG is developed by the Web Accessibility Initiative (WAI), who also have authored an additional web standard for supporting accessibility. This standard is called the Accessible Rich Internet Applications Suite, or ARIA. ARIA specifies an extension to HTML, defining additional HTML attributes that can be included in elements in order to provide additional support for screen readers. For example, ARIA provides additional support to help screen readers navigate through a page (for people who can’t just visually scroll), as well as providing a mechanism by which “rich” interactive web apps (such as those you will create with JavaScript) can communicate their behavior to screen readers.
In short, where the HTML standard falls short in supporting accessibility, ARIA steps in.
For example, the ARIA specification defines a role attribute that allows non-semantic elements (such as <div> elements) to specify their semantic purpose. For example:
<div class="btn" role="button">Submit</div>would define a unsemantic div element that is styled (via a developer-defined CSS class) to look like a button. But in order to tell the screen reader that this element can be clicked like a button, it is given the role of "button". There are a large number of different roles (following a potentially complex classification scheme), and include roles for interactive widgets such as a popup dialog, a progressbar, or a menu. These are important when making complex interactions, though for most simpler pages you can stick with the standard semantic elements (that is: use a <button> instead of a custom <div>).
The other important type of ARIA role are landmark roles. These are roles that are used to indicate specific locations in the document, to allow the screen reader to easily “jump” to different sections of the content (thus making the page navigable). Landmark roles include:
banner: the “banner” at the top of the page—that is, content related to the website rather than to the specific page itself. Alternatively, use the<header>element described below (in which case you don’t need to include therole="banner"attribute, as it is implied).navigation: a section of links for moving around the page, such as a navigation bar. This allows screen readers to quickly jump to the “quick links” and move around the page as quickly as possible. Note though that listening to all of the links read can be time consuming, so allowing the user to jump to the rest of the content is also important. Alternatively, use the<nav>element described below.main: the start of the “main” content (usually after the banner). This is useful for allowing the screen reader to jump to the meat of the page, past the banner and navigation sections. Alternatively, use the<main>element described below.contentinfo: a section that contains information about the webpage, such as author contact info and copyright information. This is usually found at the bottom of the page. Alternatively, use the<footer>element described below.
Considering your content in terms of these roles is a good design trick for figuring out how to organize your page.
Visual Information (Perceivable)
Webpages often contain a significant amount of primarily visual information. In addition to obvious media such as images or video, interactive elements may be labeled visually (e.g., a search button that with a magnifying glass icon). In order to make web pages accessible, screen readers need a way to perceive and correctly interpret such content.
The most common form of visual information are images (created with the <img> element). In order to make images accessible, you should always include an alt attribute that gives alternate text for when the images cannot be displayed (e.g., on screen readers, but also if the image fails to load):
<img src="baby_picture.jpg" alt="a cute baby">This will be read by screen readers as “a cute baby, image”. Note that the “alt-text” should not include introductory text such as “a picture of”, as screen readers will already report that something is an image!
Every image should include an alt attribute!
For more complex images (such as charts or infographics), you can instead provide a link to a longer description by using the longdesc attribute. This attribute takes a value that is a URI (relative or absolute; what you would put in the href attribute of a hyperlink) referring to where the description can be found. Screen readers will prompt the user with the option to then navigate to this long description.
<img src="accessibility_infographic.png"
     alt="an infographic showing how to make web pages accessible"
     longdesc="infographic_text.html"> <!-- link to other page with text description -->
Of course, including descriptive text is good for any user, not just the visually impaired! If you wish to add a caption to an image, you can do so accessibly by placing the image inside a <figure> element, and then using a <figcaption> element to semantically designate the caption.
<figure>
    <img src="chart.png" alt="a chart showing some information">
    <figcaption>
        A caption for the above figure. It provides the same information,
        but in a text format.
    </figcaption>
</figure>
(The <figure> element is another good example of how multiple HTML elements may be nested and combined to produce complex but accessible page structure!)
On the other hand, some images (or other elements) are purely decorative: company logos, icons that accompany text descriptions on buttons, etc. You can cause a screen reader to “skip” these elements by using an ARIA attribute aria-hidden. The element will still appear on the page, it just will be ignored by screen readers.
<!-- a search button with an icon -->
<!-- the icon img will not be read, but the button text will be -->
<button><img src="search_icon.png" aria-hidden="true">Search</button>
It is also possible to use an ARIA attribute to provide an equivalent to an alt attribute for elements other than <img>, such as a <div> that may be styled in a purely visual way (perhaps with a background image). The aria-label acts like the alt attribute for any element, specifying what text should be read in place of the normal content.
<div class="green-rect" aria-label="a giant green rectangle"></div>For longer descriptions, use the aria-describedby attribute to include a reference to the id of a different element on the same page that contains the textual description. aria-describedby takes as a value a fragment reference (similar to a bookmark hyperlink) to the element containing the description.
<div class="green-rect" aria-describedby="#rectDetail"></div>
<p id="rectDetail">The above rectangle is giant and green.</p>
As with bookmark hyperlinks, notice that the aria-describedby value starts with a #, but the target element’s id does not.
Additionally, note that while aria-label attributes replaces its elements content, the aria-describedby attribute will be read after the element’s content (see also here).
ARIA provides a number of other attributes that can be used to control screen readers, but these are the most common and useful.
Overall, the way to make purely visual information accessible is to not have purely visual information. Always include textual descriptions and captions for images, prefer text labels for buttons, etc.
In conclusion, creating accessible content basically means writing proper and semantic HTML (what you would do doing anyway), with the small extra step of making sure that visual content is also labeled and perceivable. By meeting these standards, you will ensure that your website is usable by everyone.
Resources
- Caniuse.com details about browser support for emerging web features
- W3C Validation Tools
- Website Accessibility and the Law summative blog post, May 2017
- Teach Access Tutorial for creating accessible web pages. Provides lost of examples and details. Be sure and check out the code checklist and the design checklist.
- UW Accessibility Checklist a thorough and detailed list of considerations for developing accessible systems put together by UW. See also their complete list of tools and resources.
- ARIA Resources (MDN)
- Using ARIA (w3c) official guidance for using the ARIA specification
- WAVE Accessibility Evaluation Service